

How To Add Layers To A Mailchimp Newsletter Template
Add a Background Image to a Campaign
Take your marketing to the next level and add a background image to your email or landing page.
In this article, you'll learn how to add a background image.
Before you start
Here are some things to know before you begin this process.
- This article explains how to add a background image to a basic drag-and-drop template or campaign. If you want to use a custom HTML email campaign, take a look at our Add a Background Image to a Custom HTML Template article.
- Make sure your background image meets our image requirements to ensure it doesn't stretch or distort your layout.
- Because our drag-and-drop templates are mobile responsive, It's best to add a background image to a campaign section with a single column. Background images inserted in multi-column campaign sections may distort your design on mobile devices.
- Background images can be added to the Page section of landing page campaigns, but not to the Page section of email campaigns. To place a background image here, you'll need to use a custom HTML email template.
- If you want a background image to display in Outlook for your email campaigns, use a custom HTML template.
- This article uses a regular email campaign to show you how to add a background image. Some options may look a bit different depending on the type of campaign you're working with.
About background images
Background images can be used to create a repeated, background pattern, or to display a full image behind your campaign content. Mailchimp's drag-and-drop templates support background images in the preheader, header, body, column, and footer sections of an email campaign, and in the page, header, body, and footer sections of a landing page campaign.
Background images don't render in every email client, and may appear differently in mobile clients, so it's important to thoroughly preview and test your campaigns before you send to your audience.
Background images and email clients
If you're working with an email campaign or automation, take a look at this table to find out which email clients support background images.
| Email Client | Supports Background Images |
|---|---|
| Outlook 2003 |  |
| Outlook 2007 | |
| Outlook 2010 | |
| Outlook 2013 | |
| Gmail |  |
| Outlook.com | |
| Yahoo! | |
| iOS Mail | |
| Apple Mail | |
Add a background image
To add a background image, follow these steps.
- In the email or landing page designer, click the Style tab.

- Click the section you want to add a background image to.
- Under Background, click Add an image instead to open the content studio and upload a new image from your computer, choose an image from the content studio, or import an image from a web address.

Your image will be inserted in the section you chose. Read on to learn how to style a background image.

Style a background image
Customize the style and placement of your background image to ensure your campaign has the right look.
To style a background image, follow these steps.
- In the email or landing page designer, click the Style tab.
- Choose the section that contains your background image.
- Under Background, click Edit to make changes to the image in the Photo Editor.

- When you've finished making changes in the photo editor, click Save to return to your campaign.
-
Click the Size drop-down menu and choose how large you want your image to be.
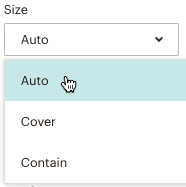
- Choose Auto to display the image at its actual size.
- Choose Cover to fill the width of the entire section. This works best for larger images with centered content, and may be cropped when viewed on different devices.
- Choose Contain to scale the image to a size that fits the height inside its container, so the entire background image can be viewed on any device.
-
Click the Position drop-down menu and choose to align your image with the Top, Center, or Bottom of the section.

-
Click the Repeat drop-down menu and choose the repeating pattern of your image.

- Choose None to have your image display only once.
- Choose Vertical to repeat the image from left to right.
- Choose Horizontal to repeat the image from top to bottom.
- Choose Both to tile the image in both directions.
-
Choose a Fallback color to display in email clients that don't support background images. Be sure to choose a color that will display your text properly.

-
After you set your style preferences, click Save.
After you style your background image, you can add any drag-and-drop content block on top of the background image in your campaign layout. It's best to use clear, short, messages in sections with background images, like an image block that contains your logo, a text block that promotes your brand, or button that links to your online store or website.
About Content Blocks
Style tips
- When in doubt, use a simple, centered image if you plan to overlay a content block.
- Padding can be added to the top and bottom of each campaign section. This allows you to control the position of your content block in the section.
- By default, the Repeat drop-down menu is set to None. This setting is best for larger images. If you have a smaller image and want to create a patterned effect, choose Horizontal, Vertical, or Both.
Note
For more information on style options for different sections in a campaign, take a look at our View or Edit Section Design article.
Test background images
We always recommend you preview any campaign you create in Mailchimp.
If you're working with an email campaign, we also recommend you thoroughly test your design. Background images aren't supported by all email clients, so it's important to send a few test emails to yourself. Or, to see how a wide variety of email clients will display your background image, use our Inbox Preview tool.
Preview and Test Your Email Campaign
Test with Inbox Preview
How To Add Layers To A Mailchimp Newsletter Template
Source: https://mailchimp.com/help/add-a-background-image-to-a-campaign/
Posted by: stokeswouslacept.blogspot.com
0 Response to "How To Add Layers To A Mailchimp Newsletter Template"
Post a Comment