

Google Pixel 2 Xl Factory Image

There will exist instances when yous would want to wink a factory image on your Pixel or Nexus device. This is either when you want a clean installation of your device'southward software, or if you want to install the latest software for your device. Google has made information technology pretty easy for users to practise this, but it will yet have a flake of piece of work. That said, when y'all really demand to wink a factory prototype, information technology will exist healthy to learn how to practise information technology.
Simply to remind all of you, we're talking about flashing OTA and factory images for official Google devices. In particular, this can be applicable to the Nexus 6, Nexus 5X, Nexus 6P, the original Pixel and Pixel XL, and the new Pixel 2 and Pixel 2 XL.
![]()
Manufacturing plant images will install stock software for these devices, which is useful if yous come from using other custom ROMs. OTA images have the aforementioned effect equally installing factory images, just they are useful if you are using stock software, because these will let y'all to flash the software without the demand for a information wipe, hence yous won't lose data on your device.
Requirements:
- Any of the Google official devices – the Nexus 6, Nexus 5X, Nexus 6P, the original Pixel and Pixel Forty, or the Pixel ii and Pixel 2 40.
- Unlocked bootloader. Your device's bootloader needs to be unlocked for yous to flash a factory epitome or an OTA image. If your device's bootloader is already unlocked and y'all are using stock software, you volition be able to flash without losing your data. An unlocked bootloader means you will accept to unlock it, and y'all will need to wipe your information, then make certain yous back them up.
- Installed ADB tools on your computer. Nosotros have a tutorial on how to install ADB on your calculator. Check that out.
- Download the correct factory paradigm or OTA epitome for your device. Recall all the horrible things you would take to experience if you somehow flashed the incorrect image for your device.
Unlocking the bootloader
If you lot know that your device's bootloader is already unlocked, then you are gratis to skip this section. Otherwise, you volition need to unlock your phone's bootloader before you can flash a manufactory image.
Bootloader are locked by manufacturers and carriers for security. Unlocking the bootloader of a device will require your device to be completely wiped going from a "locked" state to an "unlocked" state. As you lot may have guessed, there is no way to keep your data if your bootloader is locked. Hither's how to unlock the bootloader.
- Go into the Settings app.
- Wait for Developer Options. If you lot don't see this department, get to the "Well-nigh" page. Tap the Android build number several times, until it confirms "you are a developer". The Developer Options section should now show up in the Settings main menu.
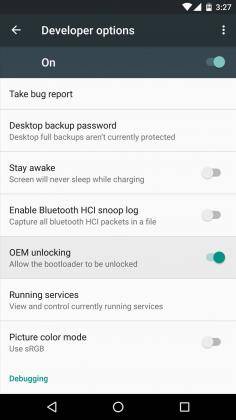
- Go into Developer Options. Put a check or toggle on OEM unlocking.
- Connect your telephone to your PC via USB data cable. Run ADB.
- Type in the control
adb reboot bootloaderto reboot the device into the bootloader. - Type in
fastboot oem unlock. This will bring yous some prompts to ask if you lot really want to unlock the bootloader. Take notation that confirming hither volition delete all the information y'all have in your device, so make sure you have already backed up your data. - Confirm the unlocking of the bootloader. Your device will at present exist completely wiped of information.
Flashing the manufacturing plant or OTA image
One time you lot accept downloaded the correct file from Google'due south official developer site, you volition need to prep it and then you can flash it onto your device. You volition have downloaded a ZIP archive file, which volition look something like "walleye-opm2.171019.029-manufactory-41296266.zip". Unzipping this file will requite you a bootloader, Os image, vendor image, and a radio image file (depending on the device you accept). Relieve these in a separate binder.
- Showtime your device in fastboot mode. Using the control terminal, you can initiate
adb reboot bootloader, or yous can reboot using the specific key combination for starting your device in fastboot mode. - Connect your device to the PC sing your USB information cablevision.
- Navigate using the command prompt to you lot're the folder where your files are.
- Execute the
flash-allscript. This script installs the necessary bootloader, baseband firmware(s), and operating system.
Once the script finishes the operation, you can reboot the device and see that you have a newly installed factory image.
Source: https://androidcommunity.com/how-to-installing-a-factory-image-or-ota-image-on-your-pixel-nexus-device-20180404/
Posted by: stokeswouslacept.blogspot.com
0 Response to "Google Pixel 2 Xl Factory Image"
Post a Comment